Overview
What is the Azenta Payment Center?
Payment Center is a payment management system on the Azenta ordering platform that enables oversight of group payment methods, sales orders, and invoices.
Why would I want to use the Payment Center feature?
The Azenta's Payment Center feature can be used to:
- Organize groups of researchers to share payment methods
- Create and manage payment methods for the group
- Assigning unique payment methods to specific people
- Keep track of billed and unbilled spend by PO* or Credit Card
- View unbilled orders and invoices checked out with Payment Center payment methods by individuals in your group*
* Payment Center only shows associated details for sales orders checked out with a Payment Center payment method Payment Center Managers can also view members’ data for data sharing between many colleagues, check out the Azenta “My Shared Projects” feature.
Saved Payment Methods
How do I save a payment method in the Payment Center?
You can save a payment method during the order checkout process by selecting the “Save this PO for future use” box (See image below). This payment method will be for your individual use only and cannot be shared with other users at this time. If you need to save and share a payment method, you can use the Group functionality explained under Payment Center Groups.

What can I do with my saved payment methods?
Your saved payments will be available for use during checkout. Additionally, you can either view your saved payment method or you can edit select fields in the Payment Center.
How can I update my saved payments?
Saved payment methods can be updated by navigating to payment center.
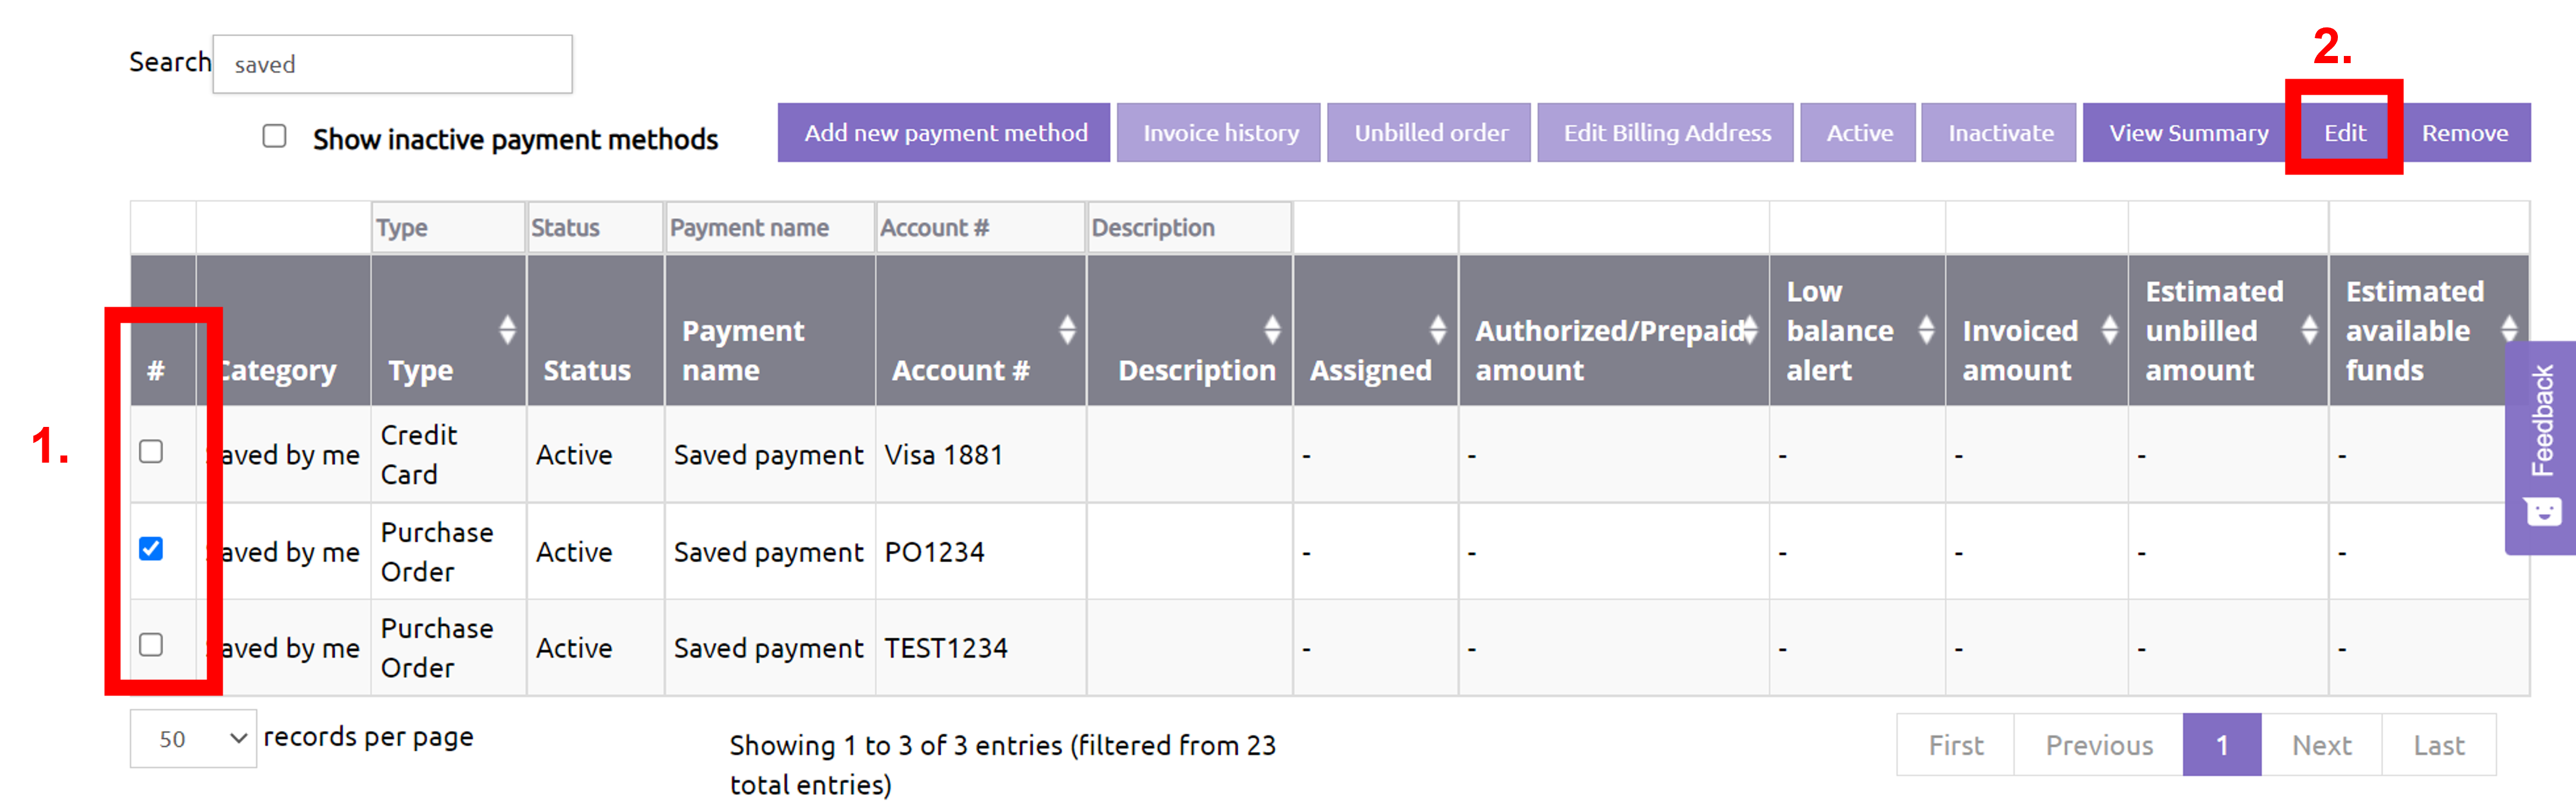
Check the box next to the payment method to be updated and 2. click “Edit.” You can edit select fields:
- For a PO, you can edit the following fields:
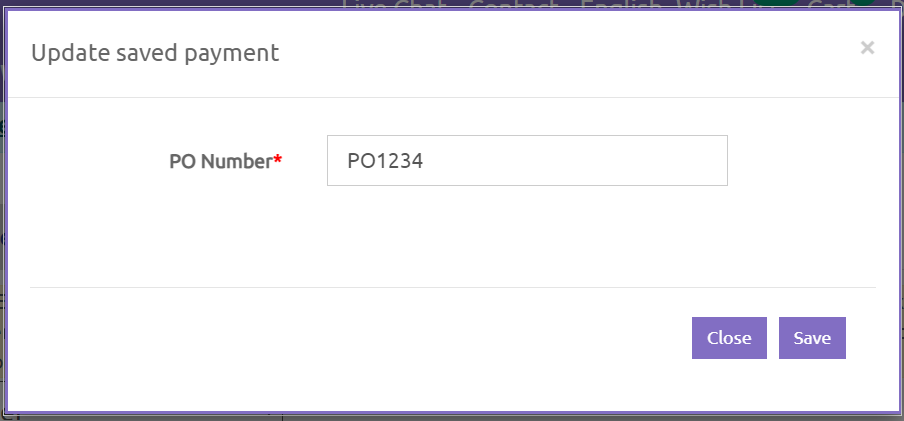
-
For a CC, you can edit the following fields:
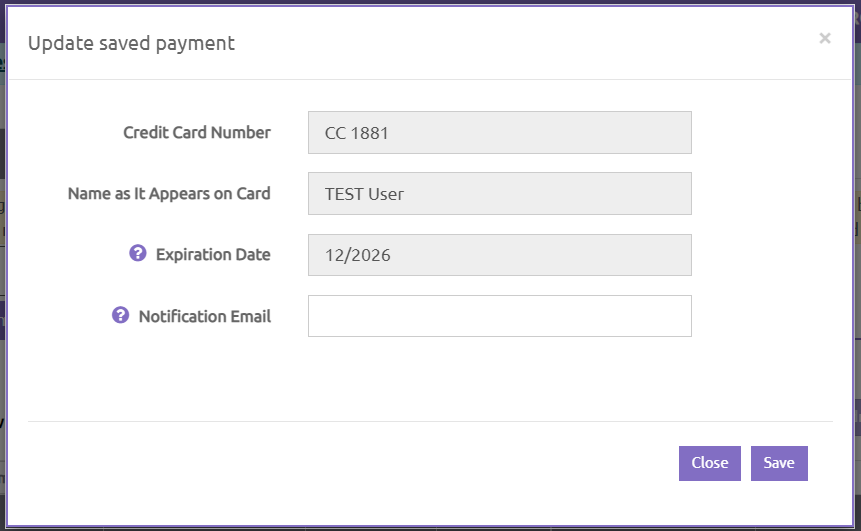
*Notification email is the only editable field
Payment Center Groups
What is a Payment Center Group?
A Payment Center Group is a centralized location to invite colleagues and share payment methods with them.
How can I save and share payment methods?
To share saved payment methods, you have to first create a group.
Then the steps to share a payment method are as follow:
- To set up a new payment method, select “Add new payment method” and select your preference from the dropdown menu: "Purchase Order" or "Credit card"
- Fill out the required fields needed to create a payment method and click “Save”
- Managers can assign payment methods to specific users by clicking the group icon found in the “Assign member” column of the “Payment methods” This will open the Assign Member pop-up window as shown below:
- The Payment method is now shared with the group member, and they can select it during order checkout.
Can I create more than 1 group?
You can create multiple groups. This function is typically used if you need to manage the payment center for several labs.
You do not need to create a new group to manage multiple POs. You can create multiple payment methods in one group and control which members within your group have the ability to use each of those payment methods.
Payment Center Roles
Who is the Payment Center Manager?
Groups are administered by a Group Manager. This person is typically a lab manager or the person in charge of making payments.
What can a Group Manager do?
- Invite colleagues to join Payment Center
- Manage payment methods and track spending for each member
- Receive notifications when orders are placed/results are available
- Access member data (paid for with a Payment Center payment method)
Who is a Payment Center Member?
Members can be any researcher who would want to share data with their Group Manager, or use the same payment methods as other members in the group.
What can a Payment Center Member do?
- Select/Use a Payment Center payment method during order checkout
- View other active members of the group
Who is the Payment Center Owner?
Payment Center Owners are typically an academic primary investigator (PI) or an industry group leader/ administrator.
What does the Payment Center Owner do?
The Payment Center Owner is the individual who is financially responsible for invoices and the associated payment methods shared by Payment Center members.
Payment Center Set Up
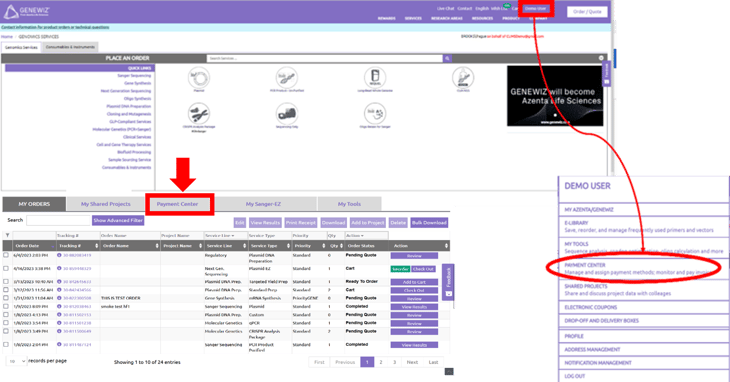
How do I access Payment Center?
Payment Center can be accessed by clicking the Payment Center tab, or by clicking the “Payment Center” link under the “My Account” menu.
Payment Center functionality is available to customers who have Azenta accounts and are associated with their correct PI and/or Institution (if you cannot see this tab, contact Technical Support).
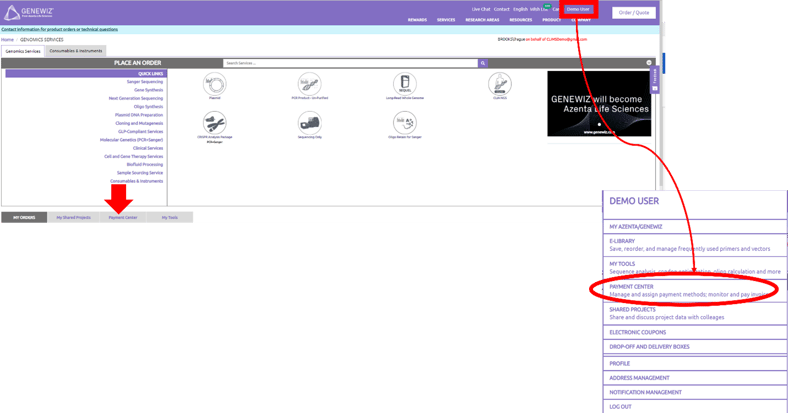
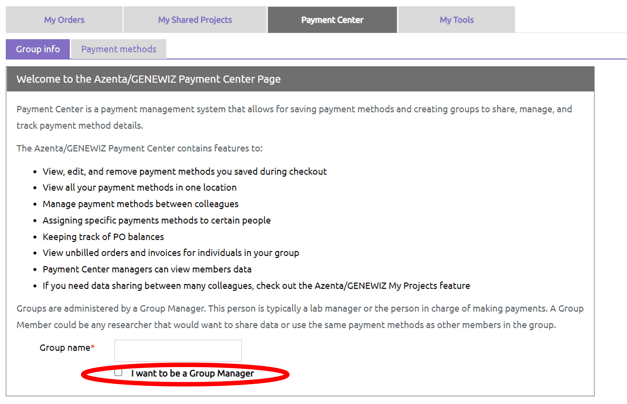
How do I become a Payment Center Manager?
Users can establish themselves as a Payment Center manager by selecting the checkbox and clicking the submit button.
What does the Payment Center Manager see?
Payment Center is organized into 6 subtabs (shown in red above) that allow Group Managers to control/edit different Group preferences & Members. Both Payment Center Managers and Members can view the “Group info” page, which shows Group name, Manager name, and the names of active Members.
How do I change the Payment Center Owner?
To change the Payment Center Owner, please contact salesops@azenta.com and provide the name, emails address and phone number for the new Payment Center owner. Note: this information is important since the Payment Center Owner is the person financially responsible for the Payment Center associated invoices.
BACK TO TOP
Member Management
What does the Payment Center Manager see inside their Payment Center? How do I add members to the Payment Center?
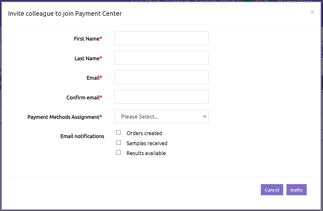
The Payment Center Manager can add lab members to their Payment Center by selecting the “Group Members” tab. Clicking the “Invite Colleagues” button will prompt a pop-up window.

Do I know that the invited member is in the Payment Center?
Once invitations are sent, all added Group Members will appear in the Group Member list:
- Members Pending User Approval must click the activation link provided in the invitation email.
- If Payment Center Members have a different PI than the Group Manager, or are affiliated with a commercial institution, a Azenta customer support representative must approve the request.
- Invitees who do not yet have a Azenta account can receive the invitation to join but will be prompted to create an account upon clicking the link in the email.

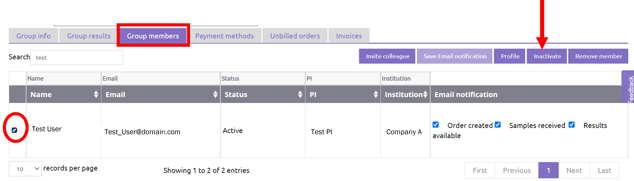
How do I remove a member from the Payment Center?
To permanently remove a Member from Payment Center, check the box next to the user you would like to remove, and select “Remove member” button.
- A pop-up window confirming your removal request will appear. Select “Yes” to proceed.
- A Member can only be removed if they have not utilized the Payment Center payment method. By removing a Member, access to the Member data and invoices will also be removed permanently.
How do I inactivate a member of my Payment Center?
To inactivate a Member, check the appropriate box in the left most column followed by the “Inactive” button.
What does the inactive function do?
The “Inactive” function allows Managers to inactivate Members of Payment Center and prevent them from placing orders using the Payment Center payments methods. To inactivate a Member, check the appropriate box in the left most column followed by the “Inactive” button.
Why do I still see an inactivated member of my Payment Center on the Member Tab?
Inactive Group Members will still appear under the Group Member tab. The Group Manager will have access to the data & invoices generated during the time the Member was active. Inactive Members will no longer have access to the Payment Center payment method(s) at checkout.
Can I be the Payment Center Manager for multiple Payment Centers?
Yes. To manage multiple groups, please click the “+ New Group” button to create a new Payment Center.

Can Payment Center members be part of Multiple Payment Centers?
Yes. One person can be a member of multiple Payment Center, each with the unique payment methods, Group Managers and Group Owners. Once part of a new Payment Center, the respective payment methods can be selected from a dropdown menu at checkout.
What if I want to leave one Payment Center and join another?
If a member has used a Payment Center payment method in the past, they cannot be removed from the Payment Center as their transactions are part of the Payment Center. However, members can be inactivated from the Payment Center and not given access to any of the payment methods.
Members can be part of multiple Payment Centers and they do not need to leave a group to join another. Note: for member PI changes, please contact salesops@azenta.com right away to discuss options available.
Payment Method Management
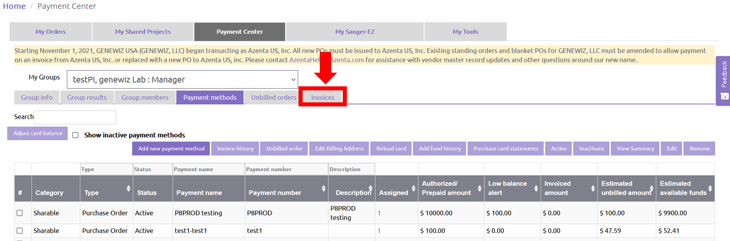
How do I add a new payment method to my Payment Center?
To set up a new payment method, select “Add new payment method” and select your preference from the dropdown menu:
- Purchase Order
- Credit card
*Please note that payment methods cannot be discarded. They can be edited or inactivated.

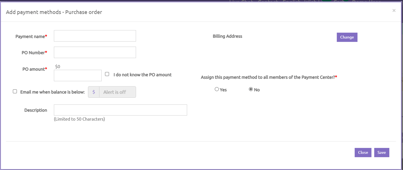
1. Adding a Purchase Order
The following information is needed to setup a Purchase Order as a Payment Method:
- PO name
- PO Number
- PO amount/starting balance on the purchase order
- Optional description (for internal record-keeping)
- Low Balance Alerts (can be turn off and on)
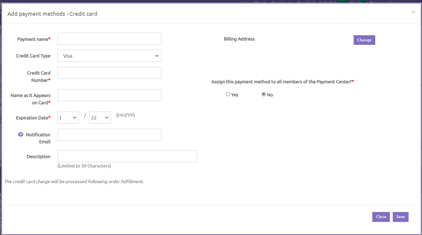
2. Adding a Credit Card
The following information is needed to setup a Credit Card as a Payment Method:
- Credit card details
- Payment Name for this card
- Optional description (for internal record-keeping)
Can I remove a payment method?
You cannot remove a payment method, but you can inactivate one. To inactivate a payment method:
- Check the box of the payment method
- Click inactivate button
- Click yes when prompted by the pop-up

If you inactivate a payment method that members are assigned to, they are removed automatically. You can reactivate an inactivated payment method
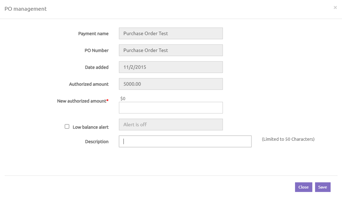
How do I update the balance of an existing payment method?
The Payment Center Manager can update the balance of an existing active payment method- Check the box(es) and click Edit
- Enter amount you wish to add under “New authorized amount” and click Save


Can I assign a Payment Center payment method to certain group members?
Managers can assign payment methods to specific users by clicking the group icon found in the “Assign member” column of the “Payment methods” tab. By default, new payment methods are not shared.

- Checking the “Assigned” box will give the Members access to this payment method during checkout.
- Checking the “Limit” box will limit the Members to the Payment Center payment method during checkout. This will effectively require the Members to use the Payment Center payment method.
Can I add to the balance of a previously created payment method?
The Payment Center Manager can update the balance of an existing active payment method- Check the box(es) and click Edit
- Enter amount you wish to add under “New authorized amount” and click Save

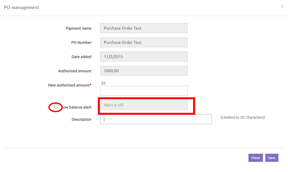
Can you alert me once a Payment Center payment methods reaches a specific dollar amount?
You can select to have a low balance alert email sent to you if your Payment Center payment method goes below a certain monetary amount:
- Click on Edit Payment method
- Check the Low Balance Alert box
- Set low balance alert amount
- Click Save button

Email will be sent daily until:
- More money is added to the payment method
- Payment method is inactivated
Genomics Prepayment
What is Genomics Prepayment?
Genomics Prepayment is a payment method within Payment Center that customers choose to buy and use to pay for GENEWIZ Genomics Services. It is a virtual prepayment method where the funds are determined and loaded by you. The prepayment can also be shared with others at your company to use as a payment method for genomics services.
Who is eligible for Genomics Prepayment?
Genomics Prepayment is available to GENEWIZ Genomics Services customers that are linked to a PI.
How do I create a Genomics Prepayment?
A Genomics Prepayment can be created through your online account. Refer to this “how-to guide” to get started.
Who can access/use my Genomics Prepayment?
Anyone you share your prepayment number and PIN with can use your prepayment to purchase genomics services by entering the prepayment number and PIN at checkout.
If you want to share your prepayment with members of your Payment Center group, you can assign group members to the prepayment within Payment Center. The prepayment will then appear under “Shared Payments” at checkout.
The scope of people you can share your prepayment with is tied to your group’s member base. When you are signed into your online account, you can view group members within Payment Center under the “Group Members” tab. You will only be able to share your prepayment with group members that have an active status.
Please note it is important to keep your prepayment credentials safe and confidential if you do not wish for others to utilize your prepayment. Anyone with access to your prepayment information and the online portal can use your prepayment for placing genomics orders.
How do I share my Genomics Prepayment with others at my company?
One way to share your prepayment is by giving your colleague(s) the prepayment number and PIN. They can enter that information within the “Payment Type” section when checking out genomics orders.
If your colleague uses your prepayment information for an order, they will automatically be assigned as a user of that prepayment. This allows your colleague to use the “Shared Payments” payment type when checking out future orders. They can select the prepayment from the “Shared Payments” dropdown list or continue to input the prepayment credentials.
Another way to share your prepayment is to assign a member to the prepayment. Navigate to Payment Center and look for the prepayment you wish to share with your colleague(s). Under the “Assigned” column, click on the number.
The “Assign-member” window will pop up and you can view active members within your group you are permitted to share your prepayment with. Check the box under “Assigned” next to the name of the group member you wish to share the prepayment with and click “Save.”
Is there a minimum limit to the funds I can choose to add to my Genomics Prepayment?
The value you allocate to your prepayment must be greater than or equal to 1.
How do I view the total remaining balance in my Genomics Prepayment?
Your remaining balance can be viewed within Payment Center. Under the “Payment Methods” tab, you will see the Genomics Prepayment you have created.
You can view your prepayment balance, the number of people assigned to your prepayment, unbilled amount, and invoiced amount.
What happens once my funds are depleted from my Genomics Prepayment?
Once funds are depleted from your prepayment, you can reload/add funds to it.
If you attempt to use a prepayment that has insufficient funds to order a genomics service, you will receive a message indicating there is an insufficient balance.
How do I use up the remaining funds on my Genomics Prepayment if my balance is less than the amount of my order?
If your prepayment balance is less than the cost of your order, you can reload your prepayment with the extra amount needed to cover your order and use the prepayment to deplete the funds to zero.
Remember, you do not need to create a new prepayment if you use all your funds. You can continue to reload the prepayment you already have to make purchases.
How do I reload/add/top-up funds to my Genomics Prepayment?
Once the original funds have depleted from your prepayment, you will want to add more funds so you can continue to use it as a payment method. This can be accomplished from Payment Center.
In Payment Center, check the box on the far left of the prepayment you wish to add the funds to. Then, select the purple “Add Fund” button. A screen will pop up for you to enter the total amount of funds you wish to reload onto your prepayment. Once you enter the amount of funds you wish to add, click “Save” and proceed with the checkout process. Once reloaded, you will immediately see your updated balance in Payment Center and the new funds will be available to use.
You can also reload funds from your home page under the “Genomics Services” tab by selecting “Genomics Prepayment” from the list of options and clicking the “Genomics Prepayment Reload” icon. Proceed with the checkout process. Once reloaded, the funds will be available for immediate use.
Please note when you add more funds to your prepayment, this can be any amount you wish that has a value greater than or equal to 1. It does not have to be the same amount originally placed on the prepayment. For instance, if the original amount placed in the prepayment was $1,000, you may reload to only have $500.
Can I create and use more than one Genomics Prepayment?
Yes, you can create and utilize more than one Genomics Prepayment.
How do I change the name of my Genomics Prepayment or PIN?
Once you are logged into your online account, navigate to Payment Center.
To edit the name of your prepayment or change your PIN, select the checkbox to the far left of the prepayment you wish to edit. Then, click the purple “Edit” button above the table.
Input the new prepayment name and PIN into the appropriate fields and click “Save” once all edits have been made to the prepayment.
How do I access my weekly/monthly/annual statements?
Your prepayment statements can be viewed and downloaded through Payment Center. Under the “Payment Methods” tab, click on “Genomics Prepayment statements.”
You can select your prepayment from a dropdown menu and choose the specific date range you wish to view. You can also download a copy of your statement.
Am I able to use my Genomics Prepayment to purchase Consumables & Instruments?
No. A Genomics Prepayment is limited to purchasing GENEWIZ Genomics Services. No consumables & instruments can be paid for using Genomics Prepayment.
Am I able to transfer the ownership of my Genomics Prepayment to a new owner?
If you need to transfer the ownership of your prepayment to a new owner, this is a special request that would need to be made with our support team.
Unbilled and Billed Spend History
How can I view my unbilled orders?
There are two ways to view your unbilled orders:
1. To view all unbilled orders that reference a specific payment method from the “Payment Methods” tab, check the appropriate box in the left most column and select the “Unbilled orders” button (circled in red).

2. All unbilled orders that reference Payment Center payment methods can be viewed from the “Unbilled orders” tab. Use the filters & search function as shown above to alter your results.

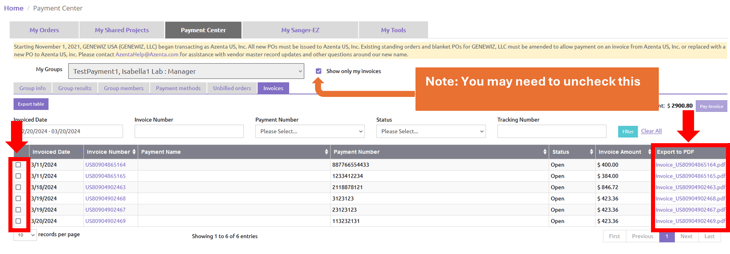
How can I view my invoice history?
There are two ways to view your invoice history:
1. To view all invoices that reference a specific payment method from the “Payment Methods” tab, check the appropriate box in the left most column and select the “Invoice History” button (circled in red).

2. All invoices that reference Payment Center payment methods can be viewed from the “Invoices” tab. Use the filters & search function as shown above to alter your results.

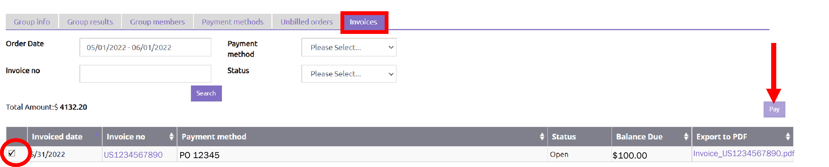
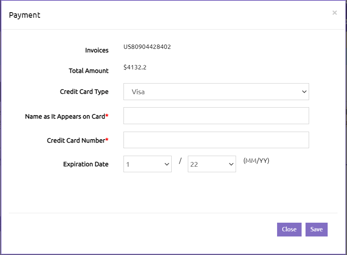
Can I pay my Payment Center payment related invoices online?
YES! The Payment Center manager can pay invoices using a credit card directly from Payment Center Invoice Tab.
- Check the box(es) and click pay
- Enter Credit Card information and click Save
Viewing Group Results
How do I view group member results?
You can view the results by:
- Clicking on the Group Results tab
- Sorting and filtering
- Click the "Download" button
In the “Group results” tab, Group Member orders can be sorted and filtered in the following ways:
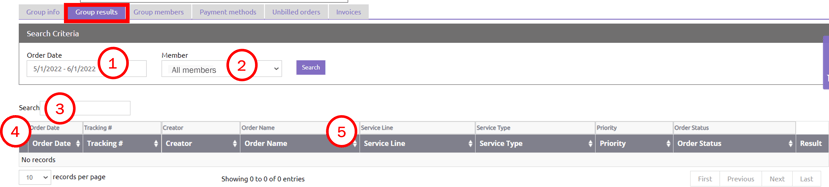
1. Order date range search box
2. Payment Center Member dropdown
3. Text search box (which allows you to search keyword, such as tracking number, order name, service type, etc.)
4. Text search box shown in each column of the table header
5. Ascending or descending arrows shown in each column of the table header
Using Payment Center Payment Methods
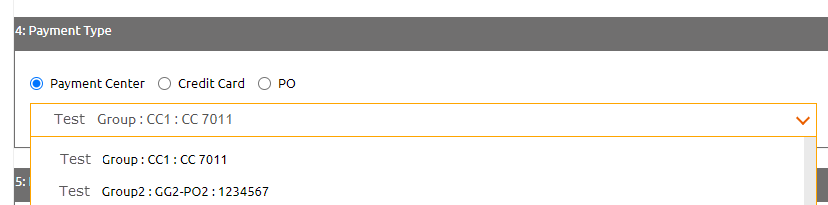
As a member, how can I select a Payment Center payment method when I checkout?
Members can access their assigned Payment Center payment methods at checkout by selecting the “Payment Center” option in the Payment Type field, as shown above.

What if I am assigned to more than 1 Payment Center Payment method?
If you are assigned to more than 1 Payment Center Payment method there will a dropdown menu so you can select the correct one to use for order you are checking out.
Can I manually type in the PO number or Credit Card Information during checkout of my order?
- Members can still manually enter a separate PO number or credit card independently of the Payment Center payment method functionality at checkout.
- Manually typing the PO associated with the Payment Center in the PO field will not invoice the order to the Payment Center PO.
How to Find My Invoice
Step 1: Access the Payment Center.
Access the Payment Center by clicking the Payment Center tab, or by clicking the “Payment Center” link under the “My Account” menu.
Payment Center functionality is available to customers who have Azenta accounts and are associated with their correct PI and/or Institution (if you cannot see this tab, contact Technical Support).
Step 2: Click on the Invoices tab.
Step 3: Adjust the date range (3a) to cover the period you need to retrieve your invoice and click the filter button (3b) to execute the search.
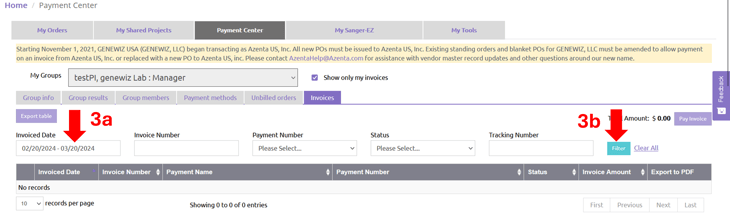
Step 4: Select and download your invoice of choice.
Please note that invoices from July 16, 2023, or any older open invoices, are available in your account.